Automate macOS screenshots with AI and make file discovery effortless
Use AI to automate macOS screenshots and transform cluttered filenames into clear, searchable archives with a simple Shortcut.
If you’re anything like me, screenshots are your tiny daily lifesavers. They capture quick reminders, UI references, travel confirmations, receipts, map directions, bits of inspiration, or that one funny comment you swear you’ll revisit someday. And yet, despite their usefulness, they turn into digital laundry within minutes.
I use CleanShot to grab all my screenshots, and one of its best features is letting me choose exactly where they’re stored. I point it to a dedicated Screenshots folder in my iCloud Drive, something I set up every time I get a new Mac, so everything stays synced across devices. The convenience is great, but the filenames aren’t! A long parade of Screenshot 2024-11-15 at 16.28.02.png files, which is basically macOS whispering: “Good luck finding this later.” 🙄
After years of scrolling through dozens of identical filenames, hoping to stumble upon the right one, I finally taught my Mac to rename screenshots automatically. And not with generic names either. With descriptive, human-friendly names created by AI, the moment a screenshot hits my Screenshots folder.
This guide walks you through building the automation, why it’s incredibly useful, and how to tailor it to your workflow.
Why automating screenshot names matters
Most of us think of screenshots as quick snapshots rather than files to organize. We tell ourselves we’ll sort them out later, but that moment never comes. Smart naming turns those fleeting captures into:
- searchable reference points
- properly indexed project material
- quick-to-find work documentation
- organized visual notes
- synced, meaningful archives across devices
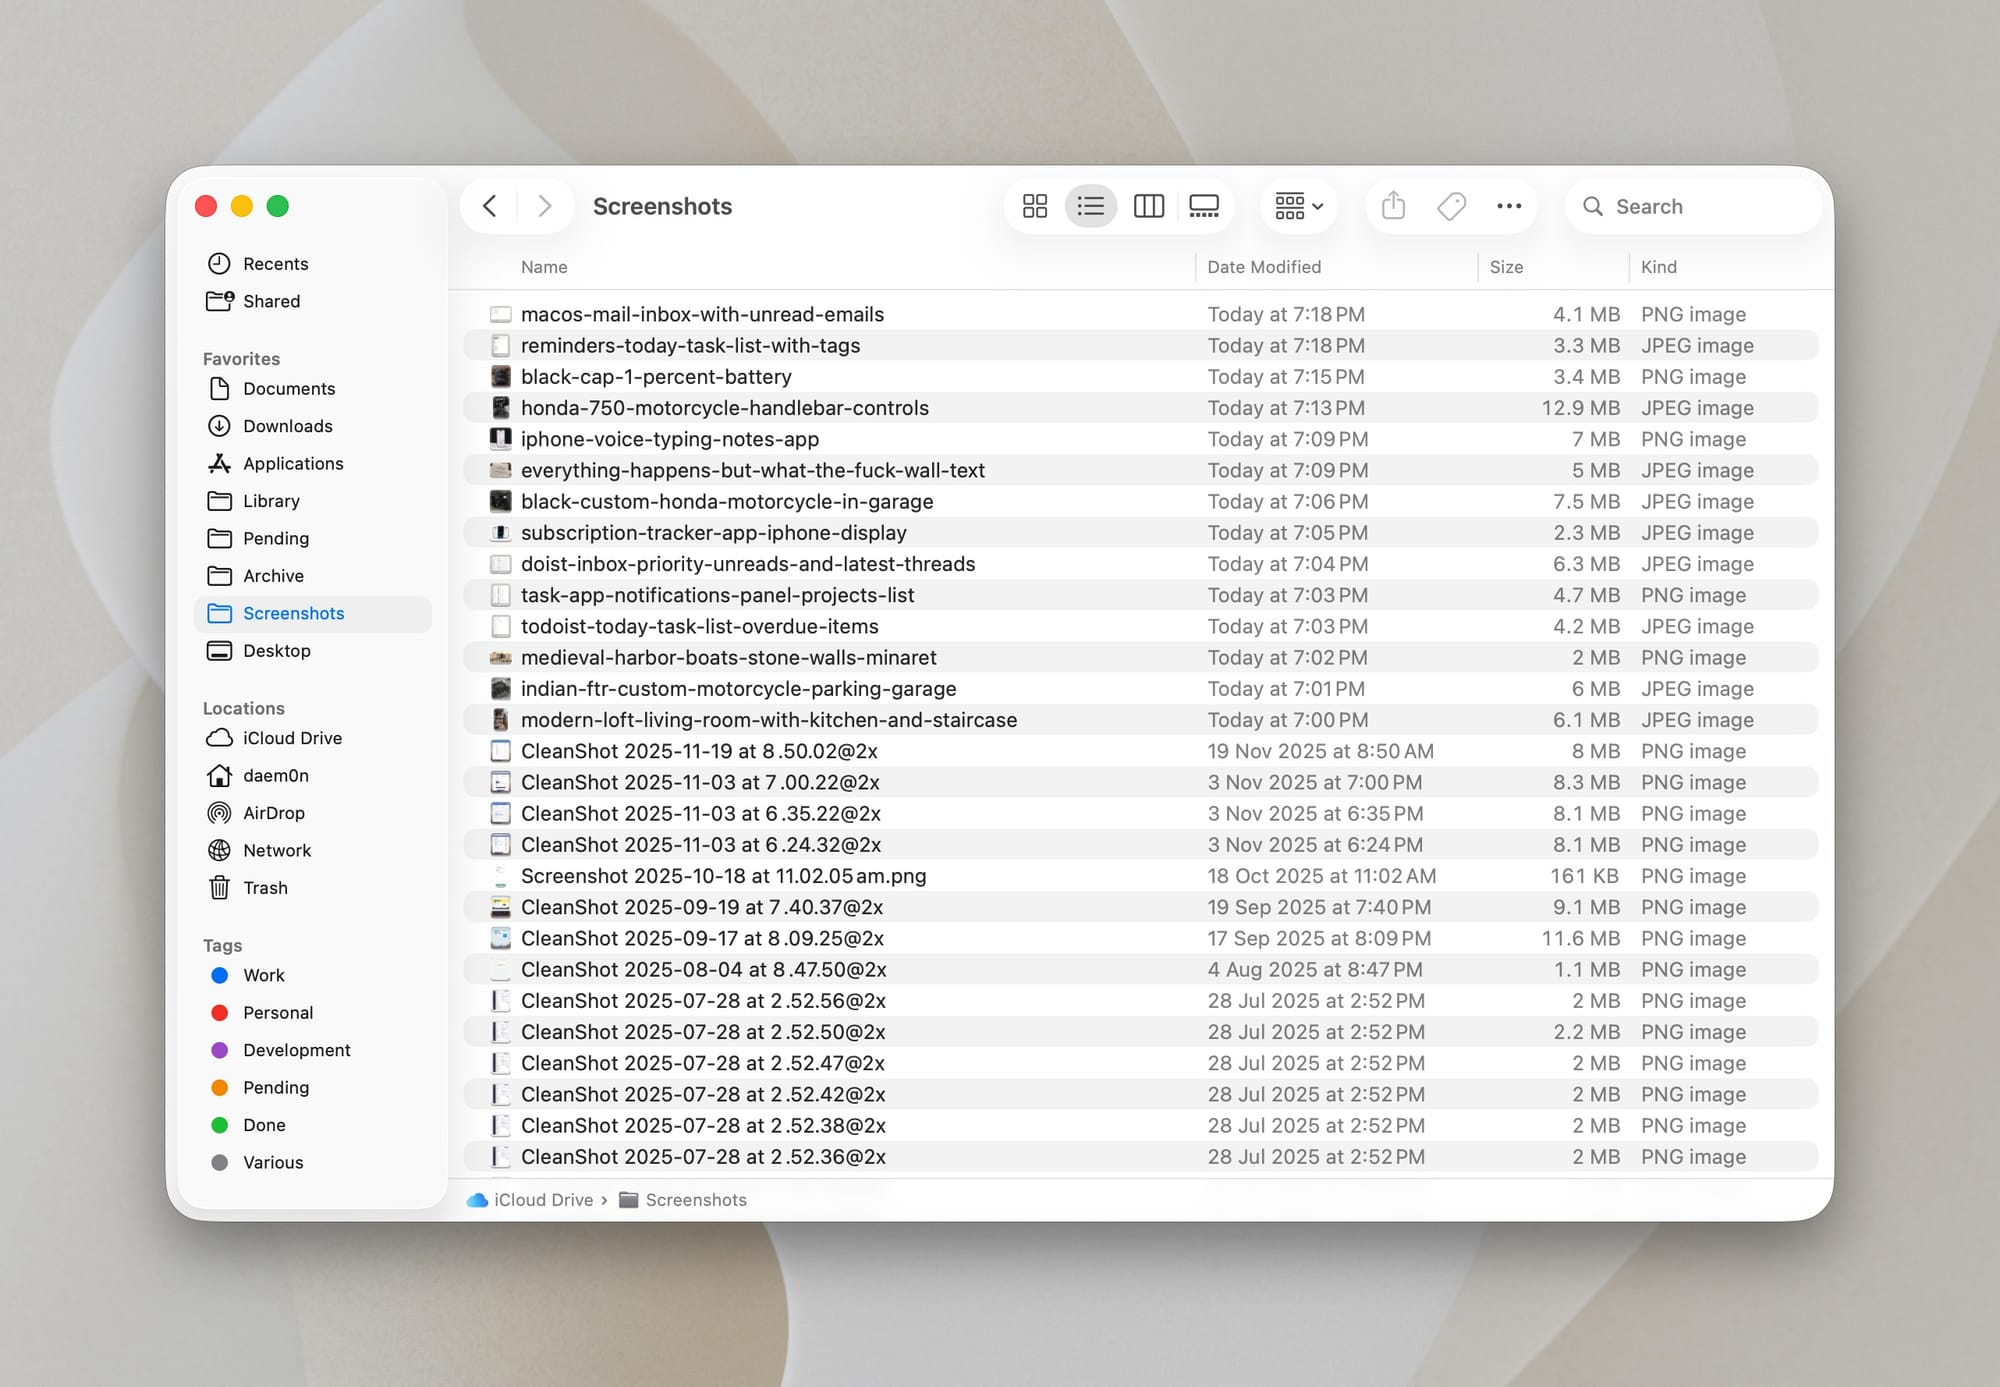
When a screenshot is named “todoist-new-schedule-design" or "timeline-layout-exploration”, you don’t need luck or guesswork. You just type a word into Spotlight, Finder, or Raycast, and it’s there. Automation makes this effortless. You take the screenshot, the Shortcut renames it instantly, and you carry on. Smart filenames aren’t just tidy, they turn screenshots into a searchable knowledge base.
Let's build the automation
Before diving into the steps themselves, it helps to have a clear picture of what this setup requires. You’ll need a Mac running macOS with the Shortcuts app installed, along with either Apple Intelligence or ChatGPT connected, so the Shortcut can generate descriptive filenames. You’ll also want a single dedicated folder where all your screenshots land. By default, macOS saves screenshots to the desktop, which works fine for quick temporary captures, but if you tend to keep your screenshots for reference or archiving, it makes more sense to create a dedicated folder somewhere less cluttered. Whether that’s in iCloud Drive or anywhere else is completely a matter of preference.
With everything set up, you can now build the automation step by step.
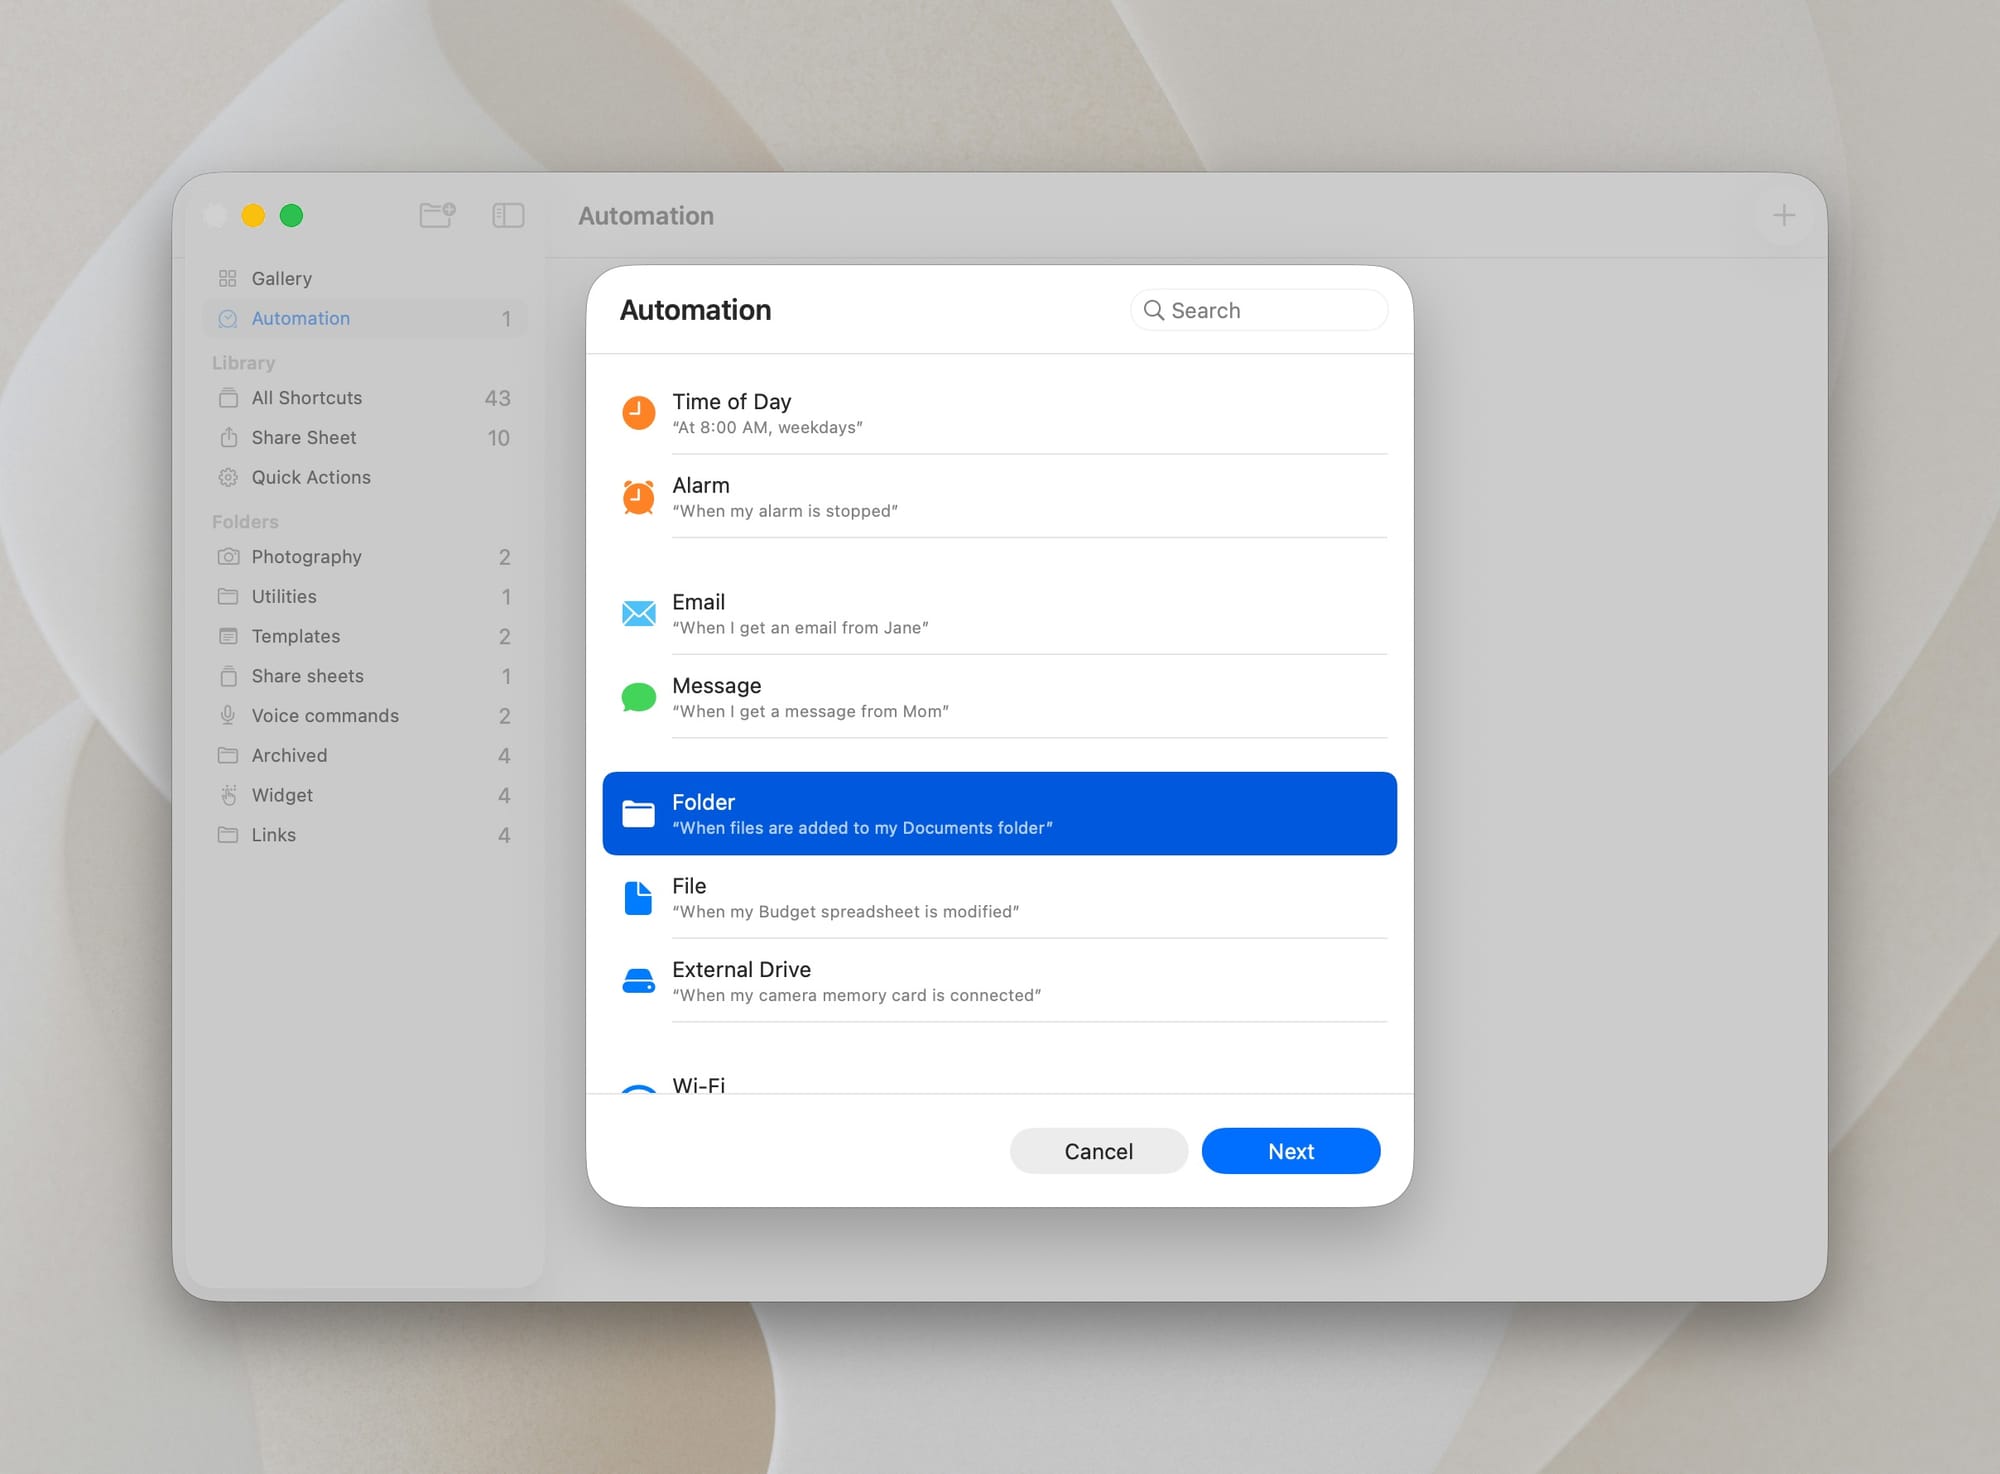
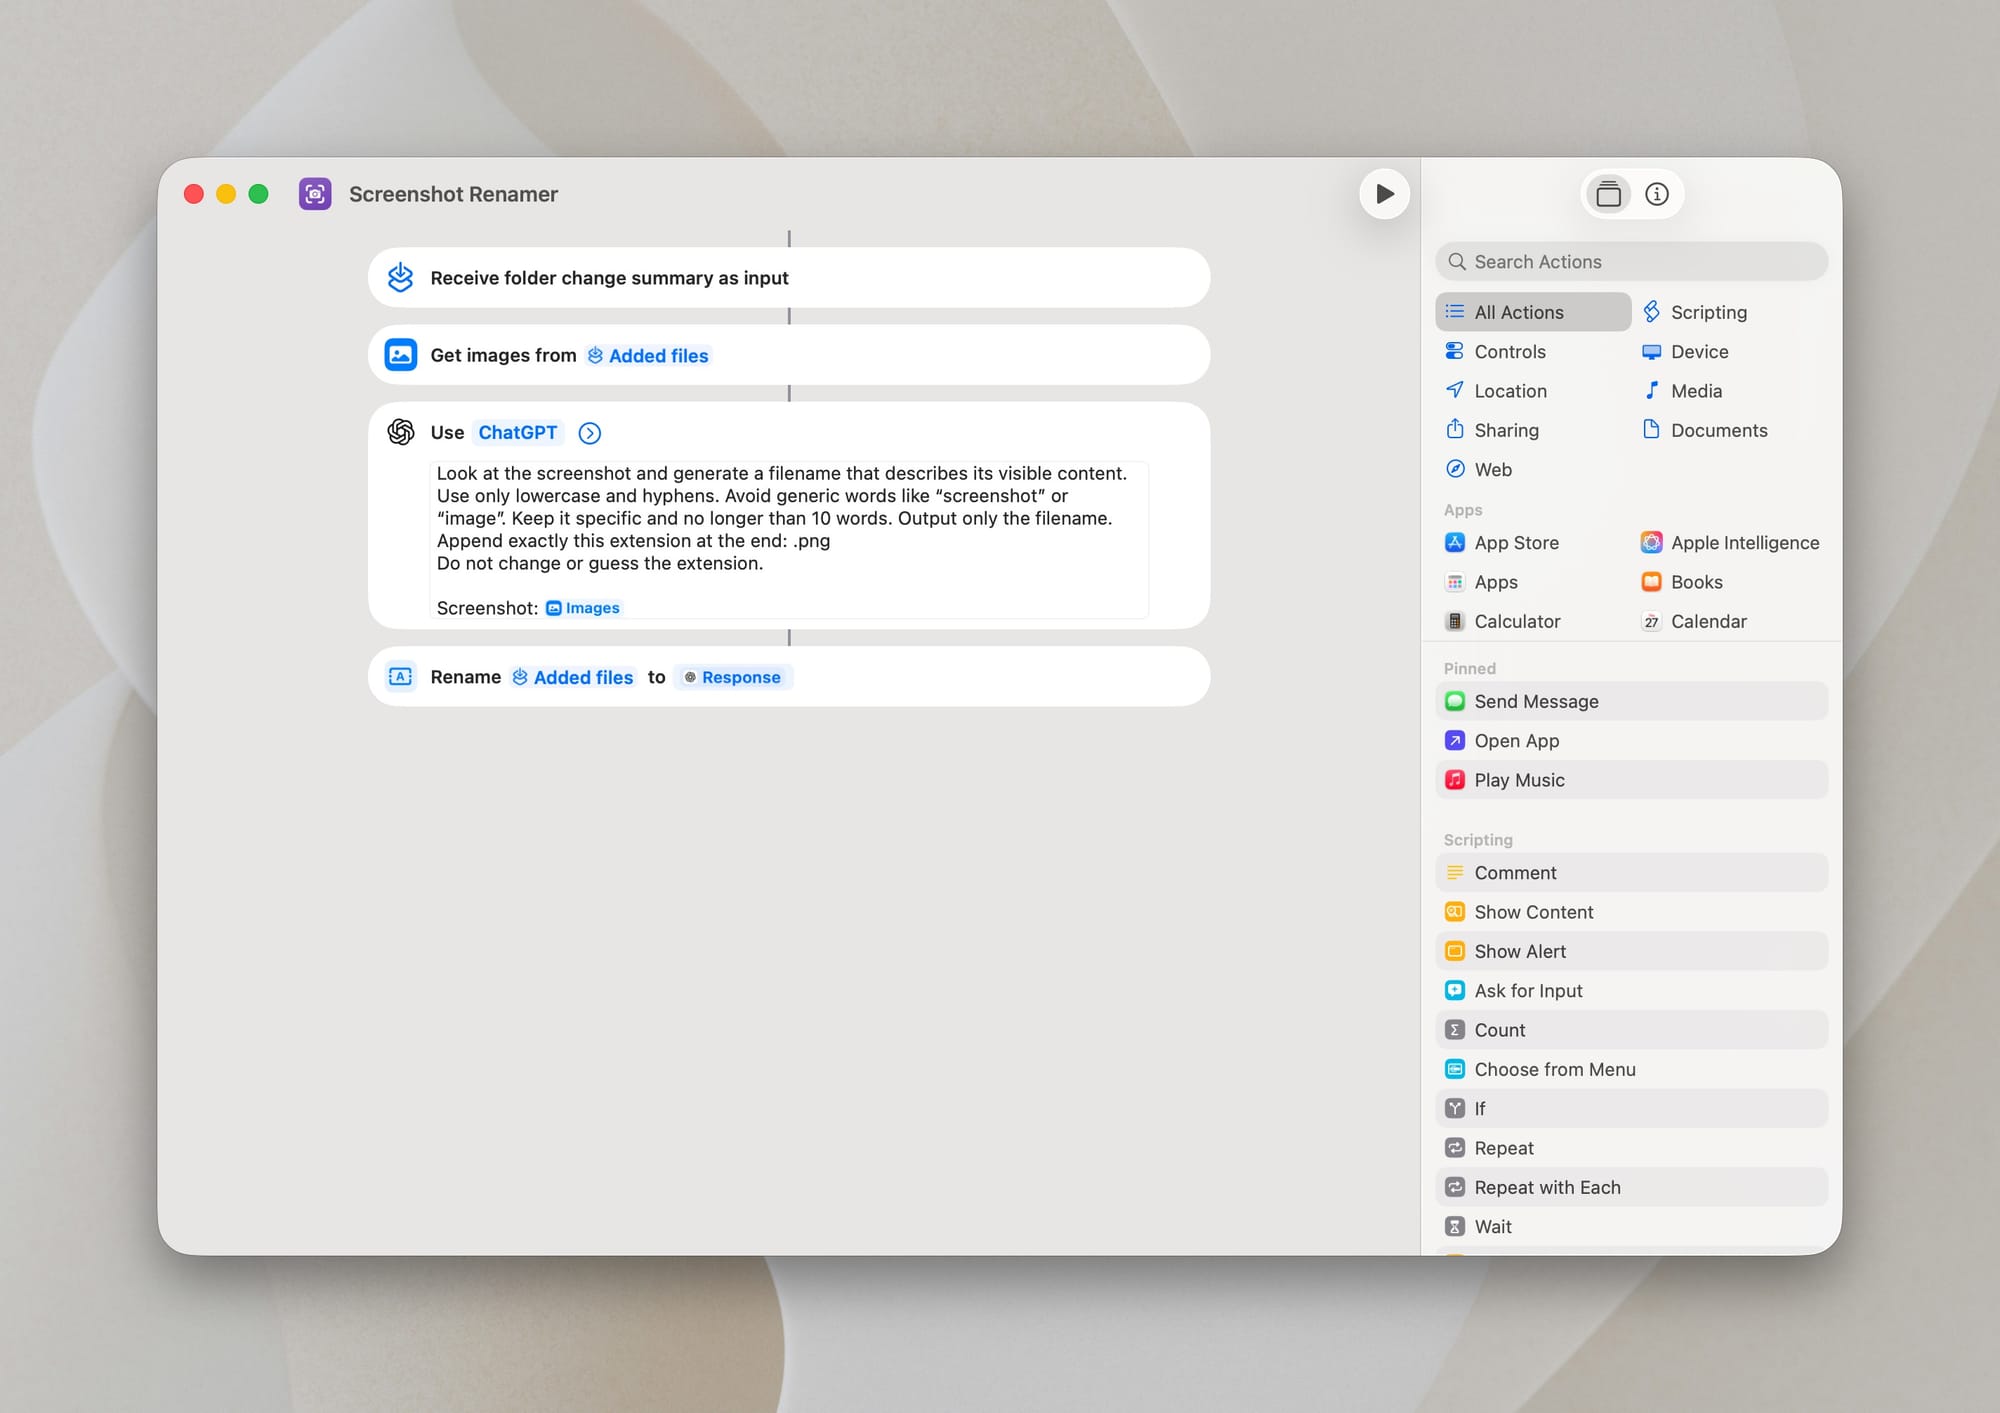
Step 1: Create the automation in Shortcuts
Open Shortcuts, go to Automation, and click the + button at the top right.
Choose When files are added to my Documents folder.
Then:
- Select your Screenshots folder.
- Set it to trigger When any item is added.
- Turn on Run Immediately
- (Optional) Turn on Notify When Run if you like confirmations.
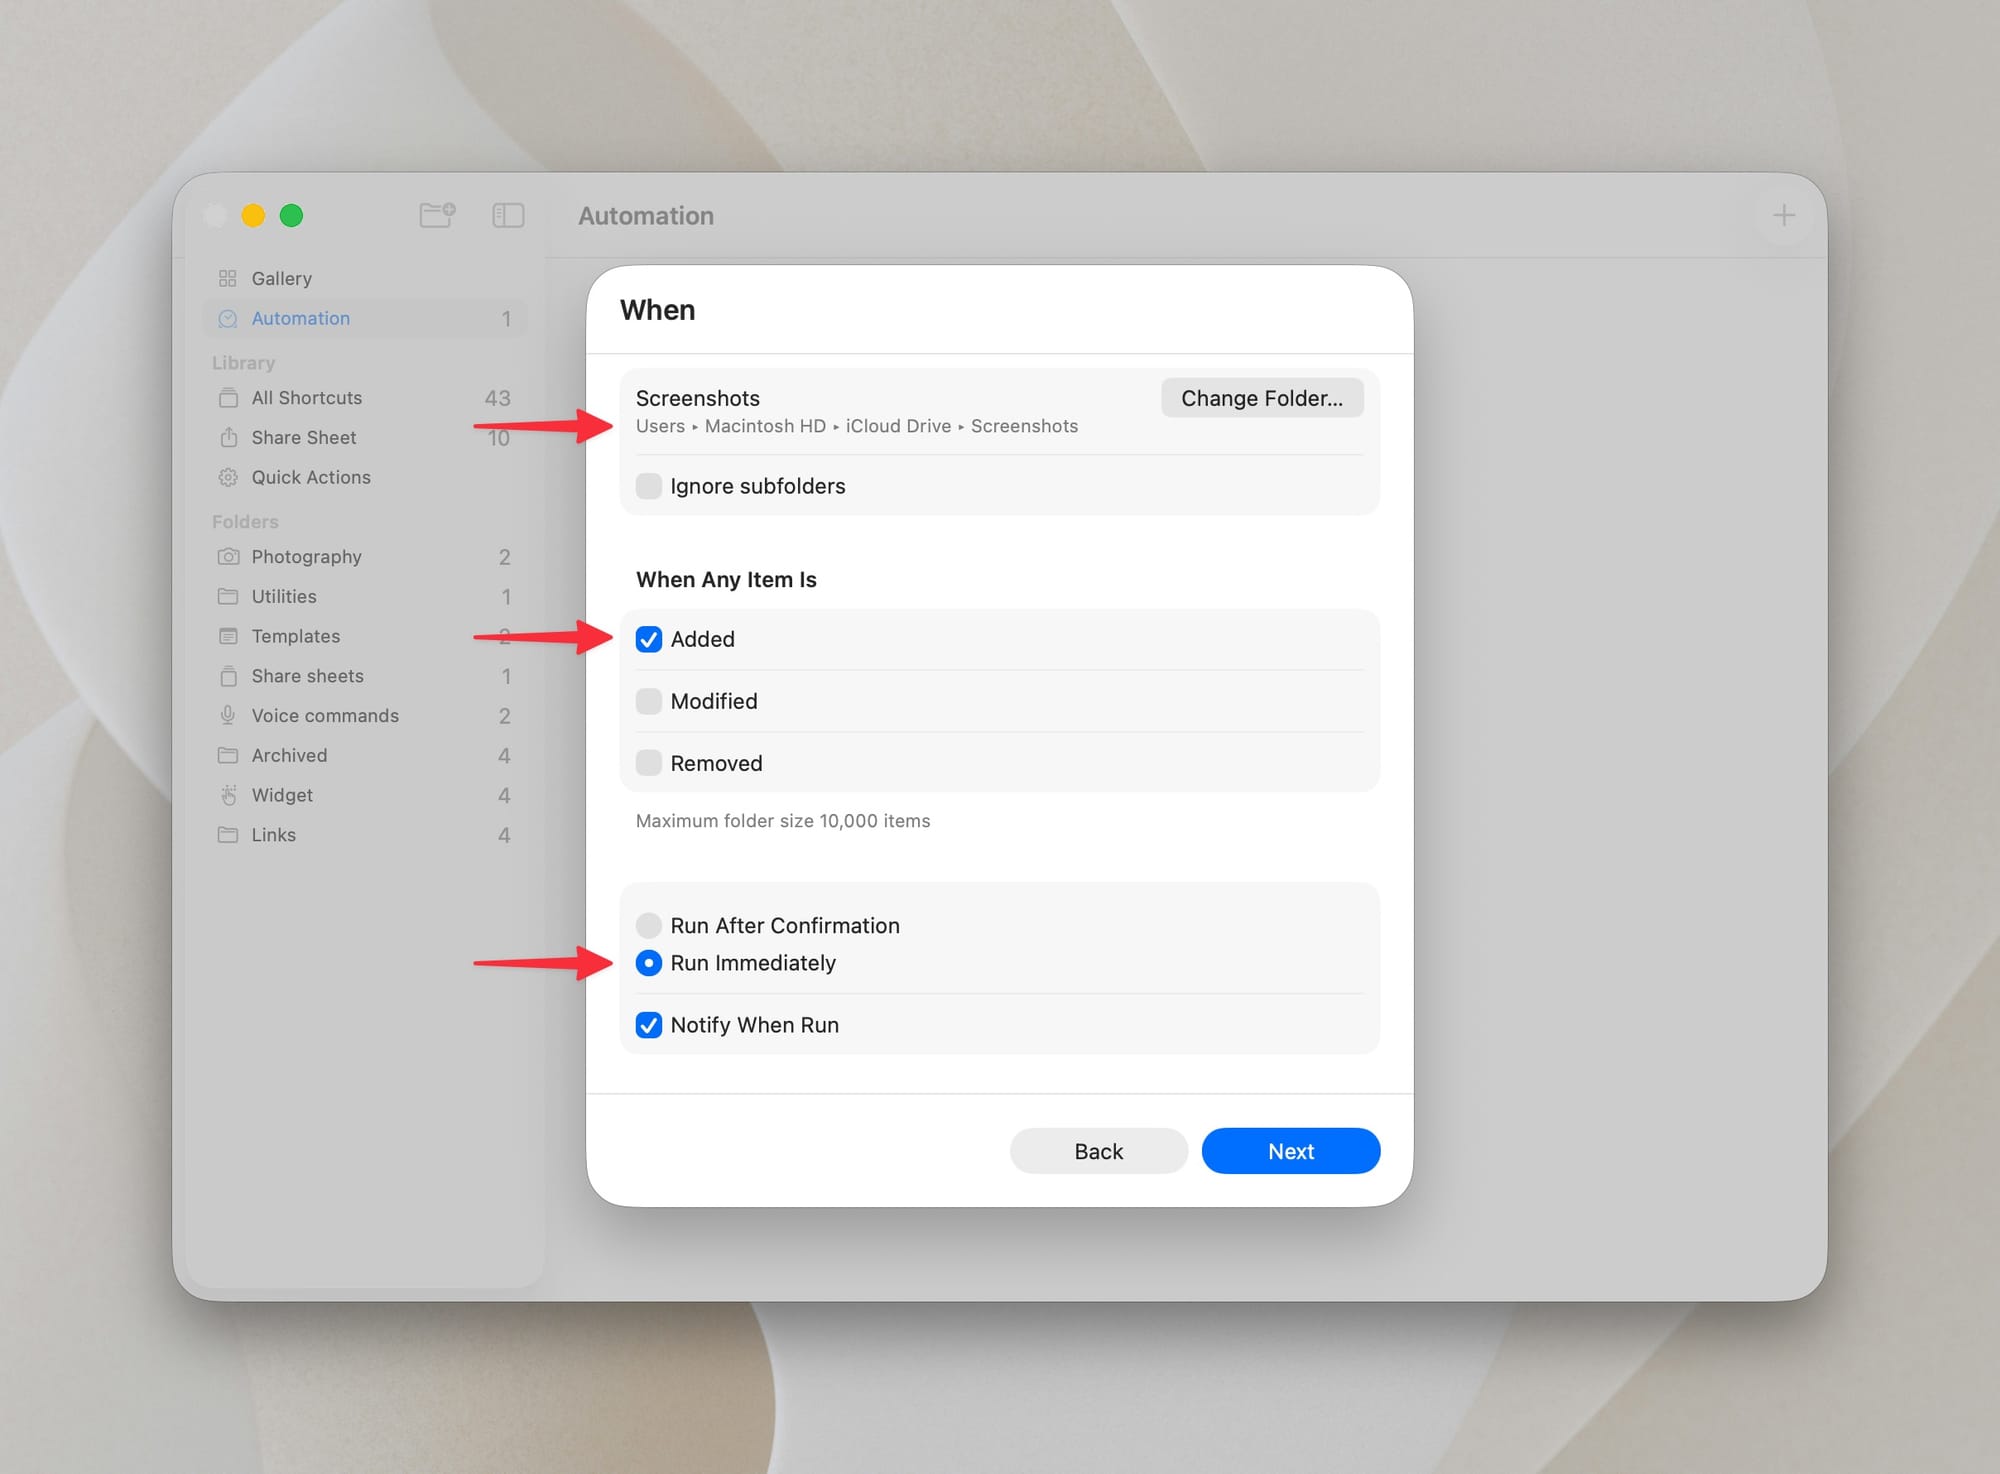
Tap Next, then New Shortcut.
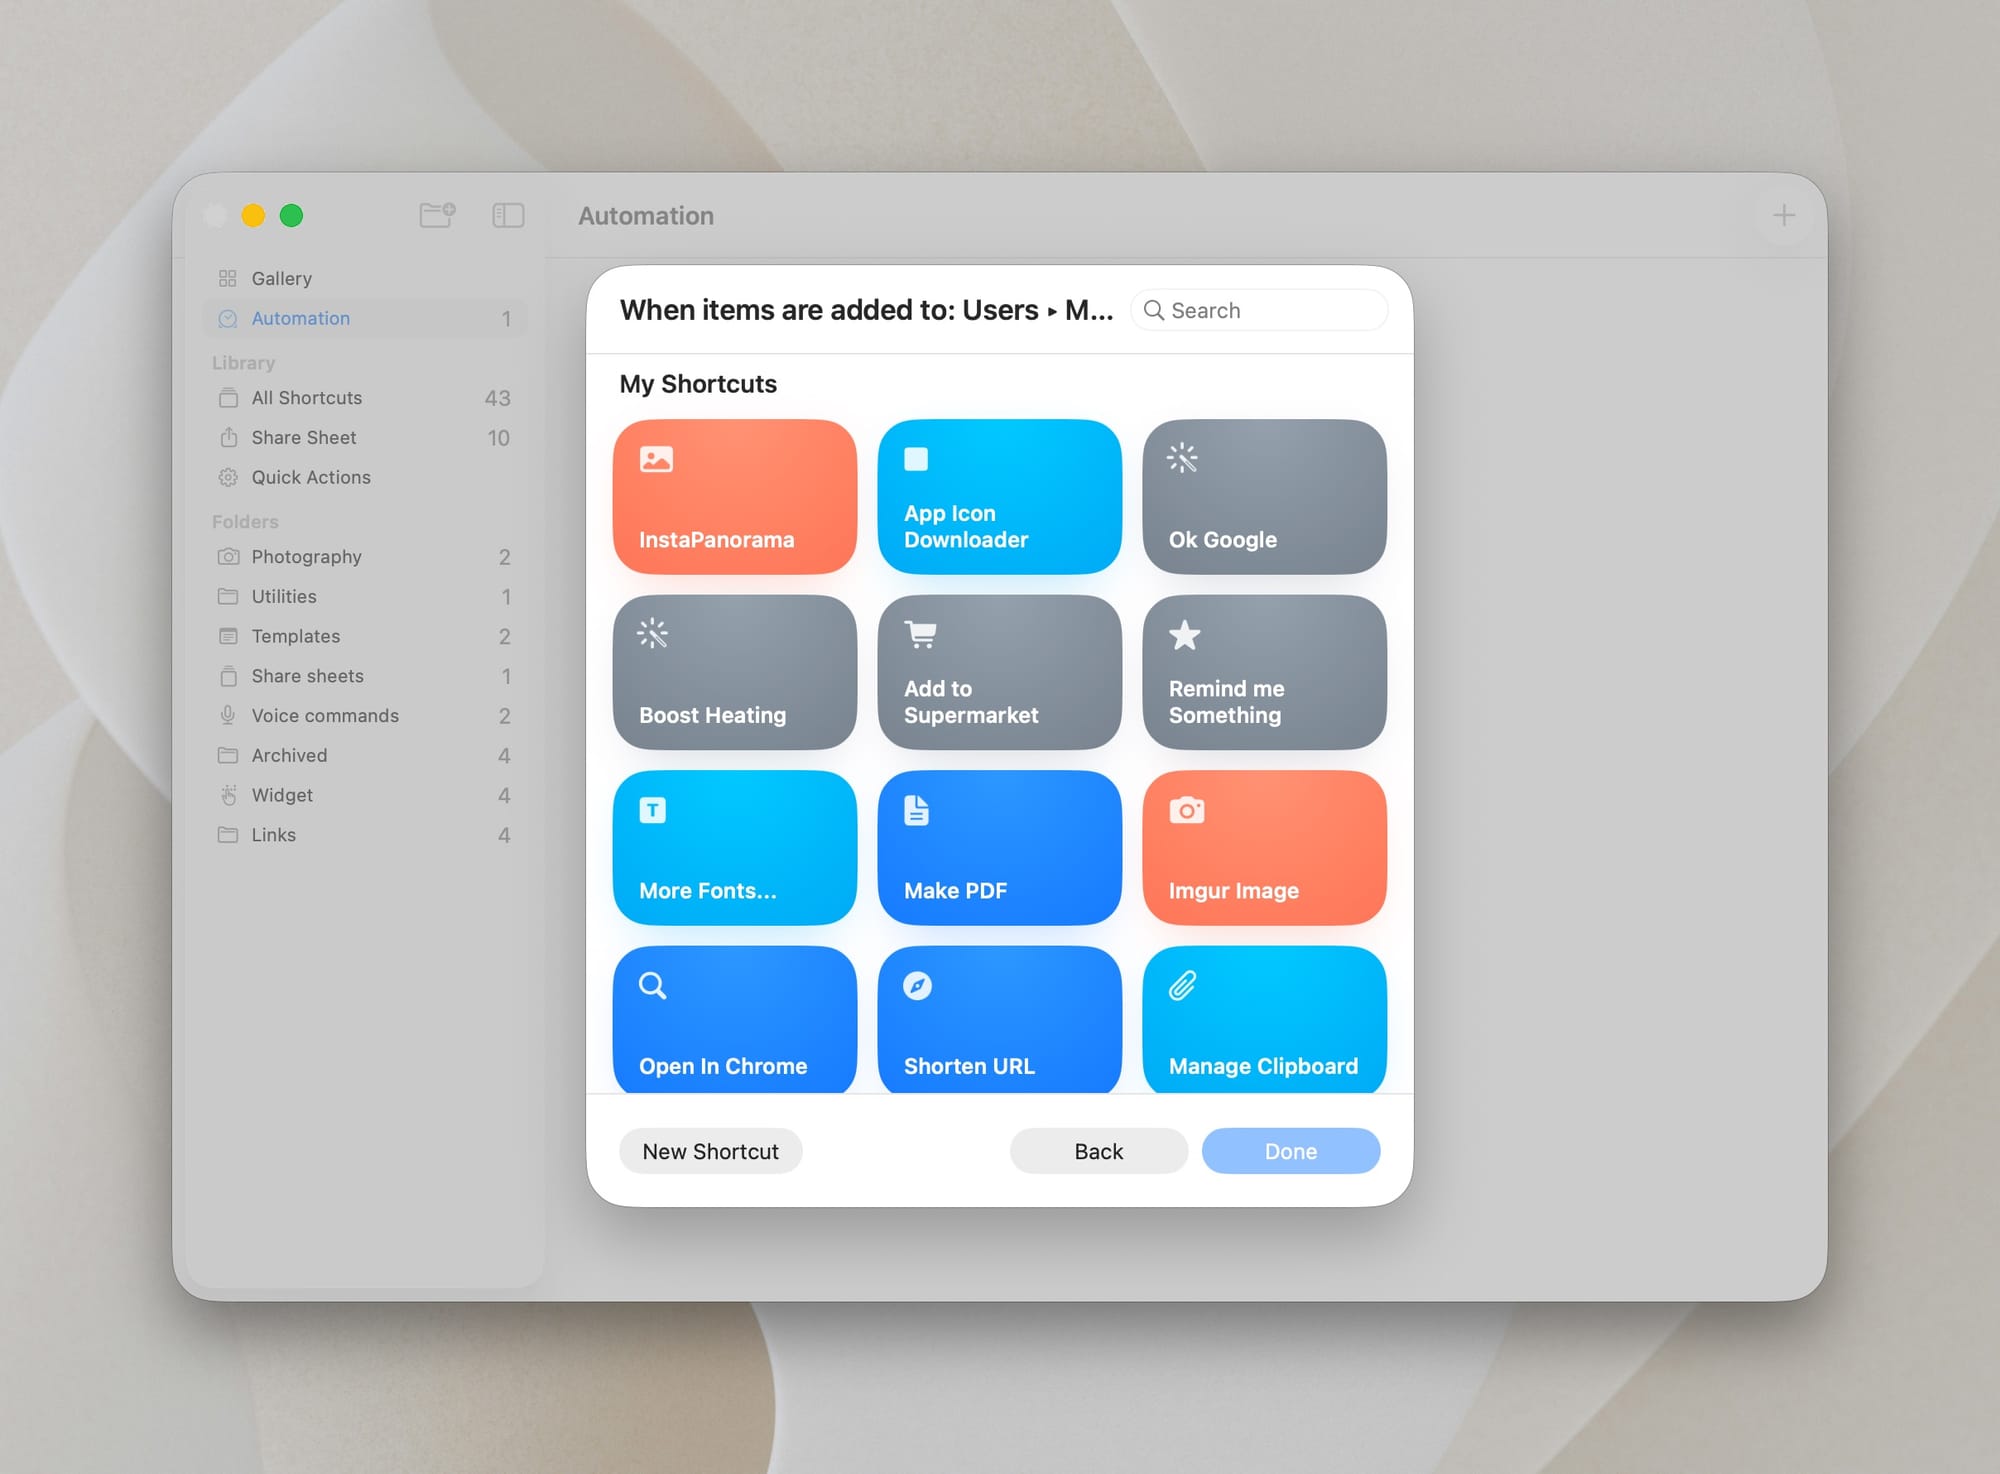
This creates an empty canvas where the magic will happen.
Step 2: Get the screenshot file from the shortcut input
Use the search on the right to find and add the action Get Images from Input.
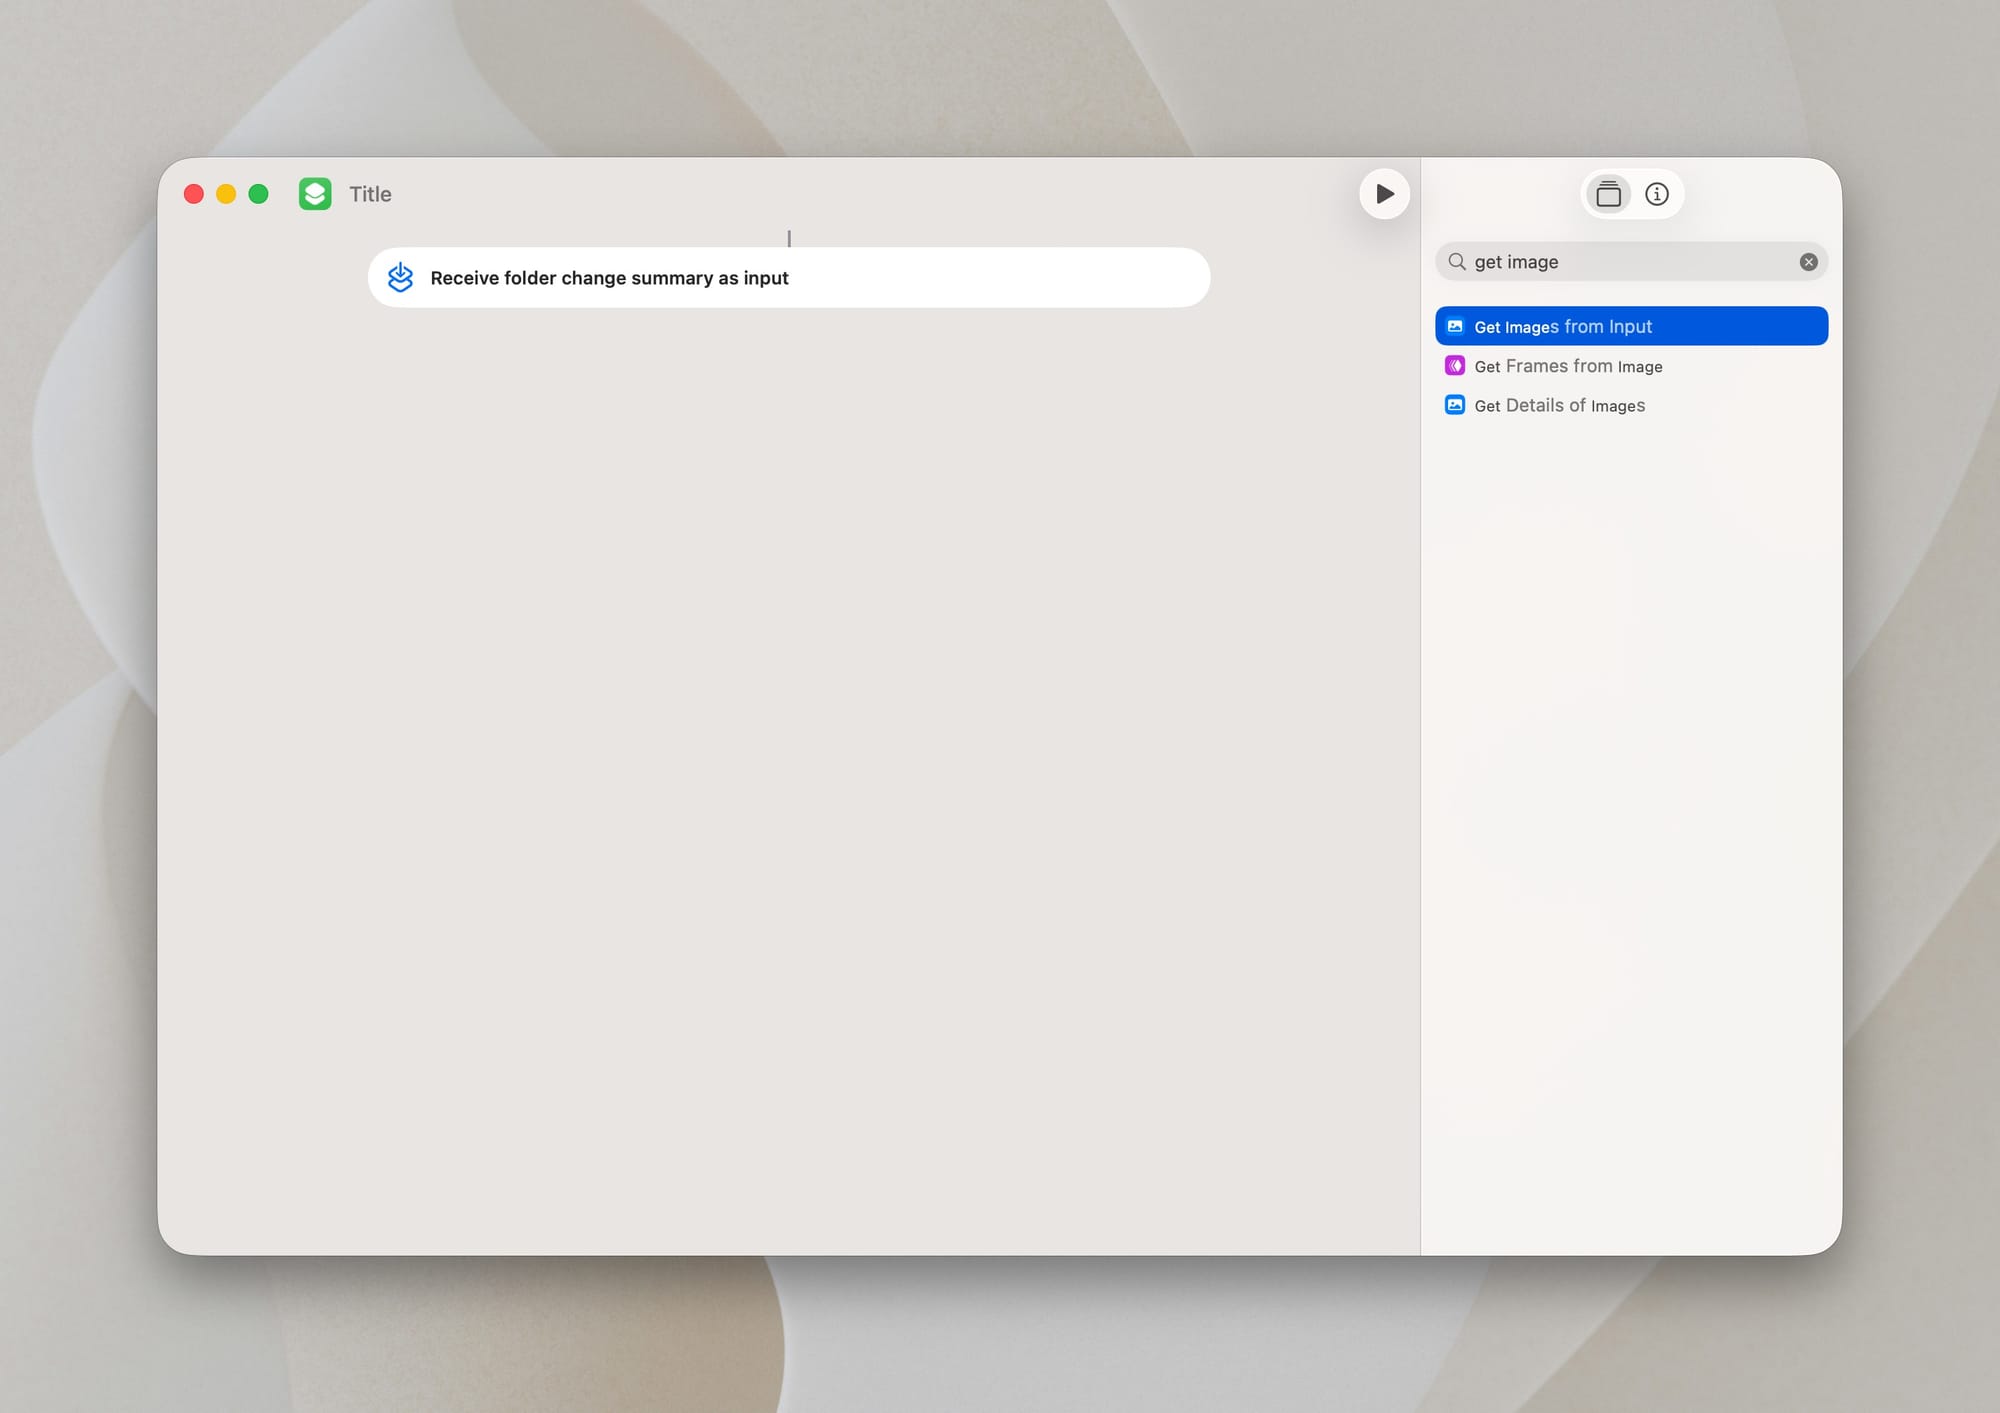
Click the little blue “Input” field and make sure it’s set to Shortcut Input.
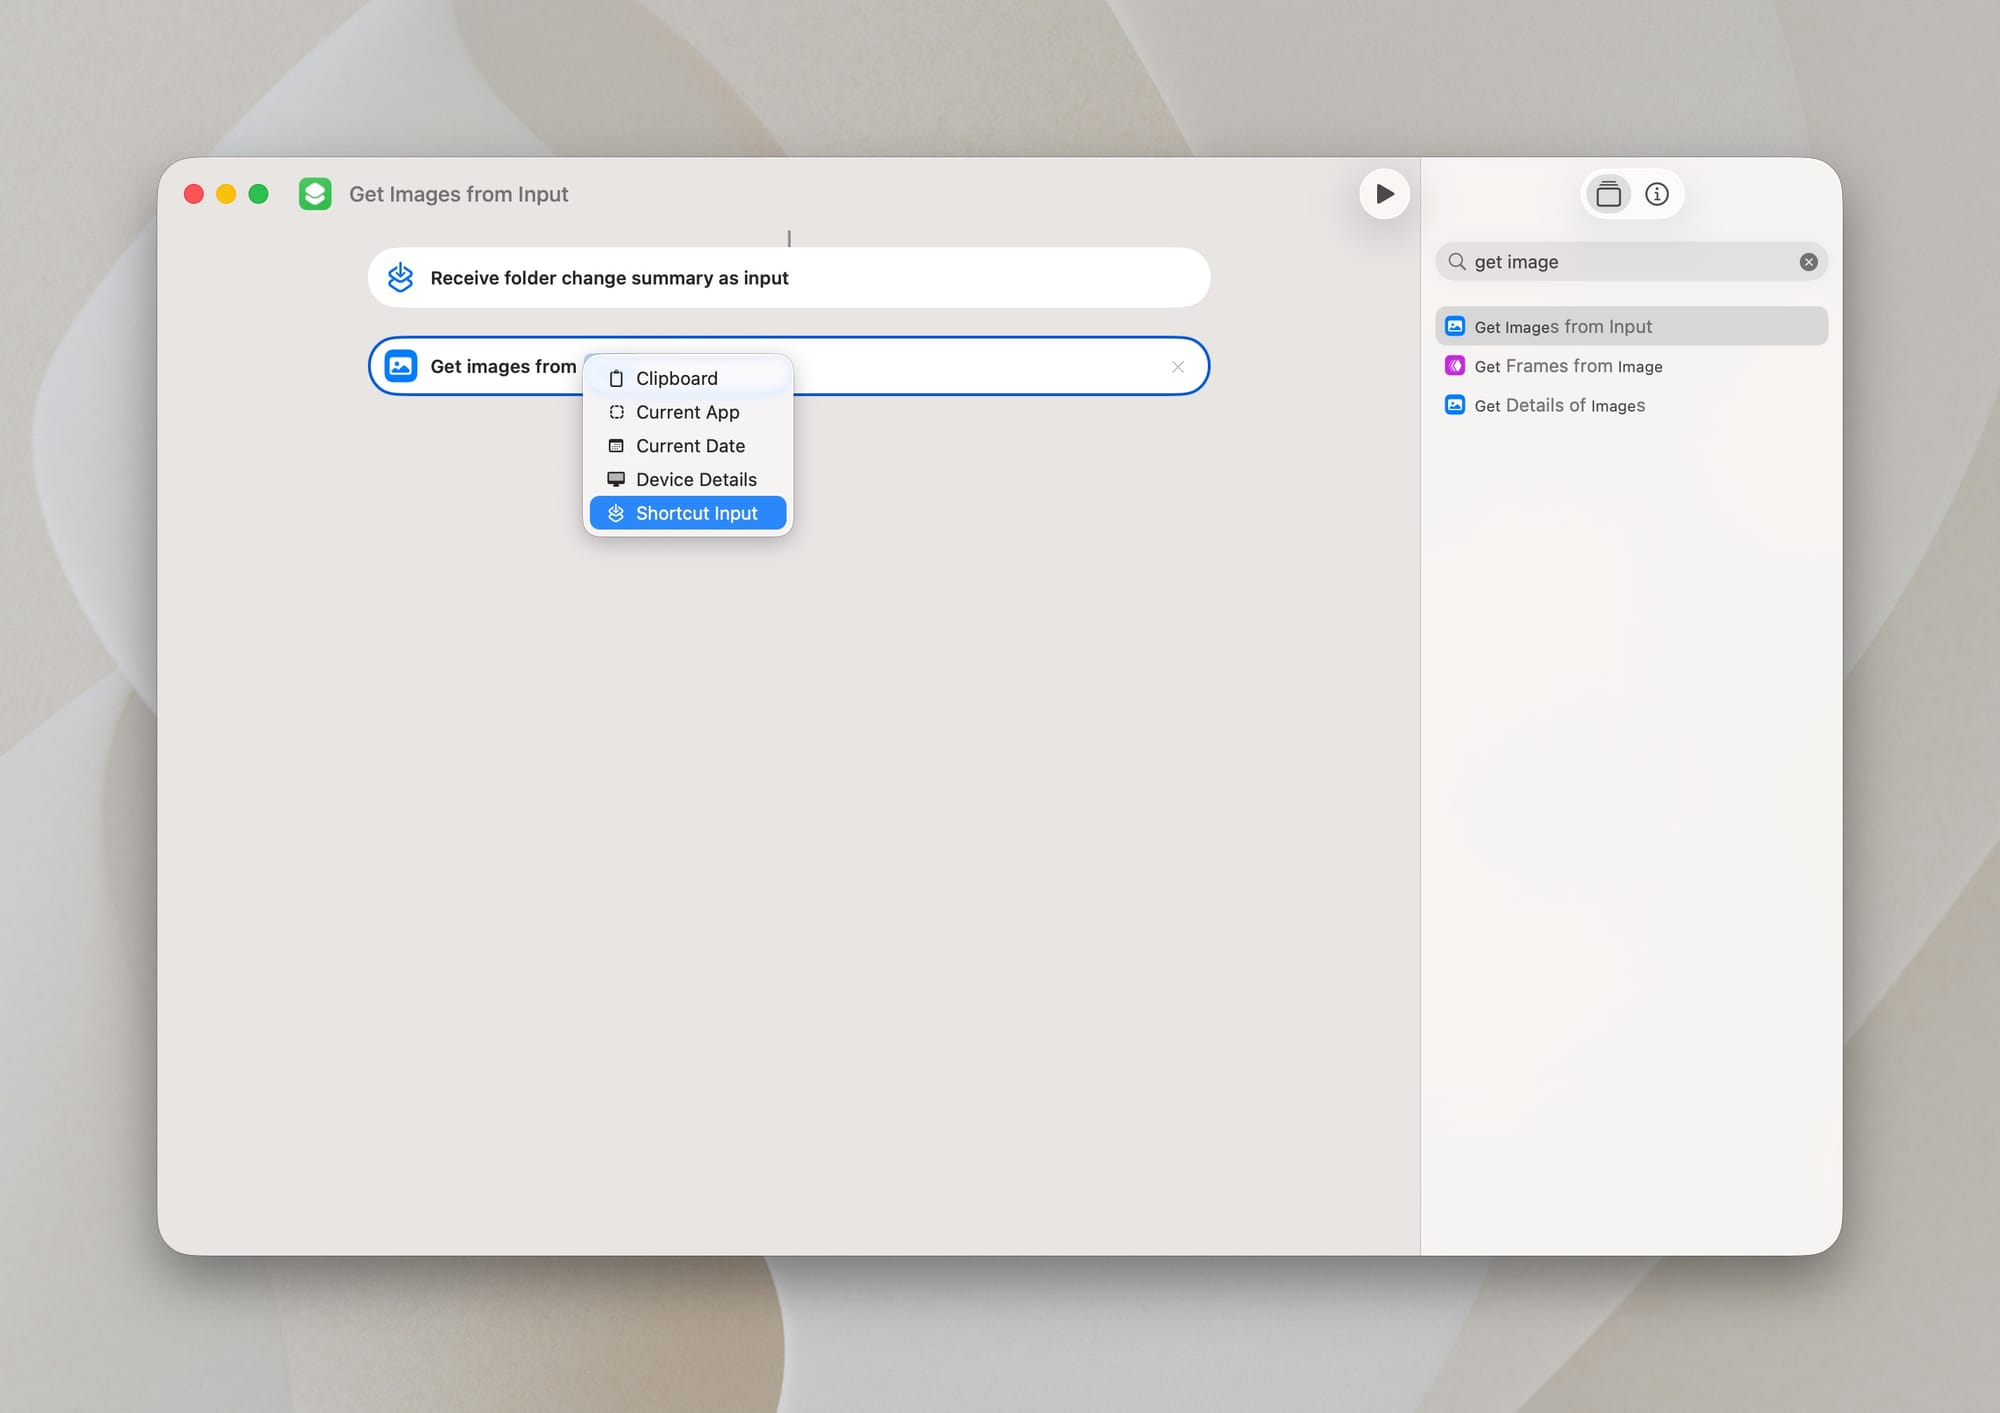
Then click it again and set it to Added Files.

This ensures only new screenshots are processed.
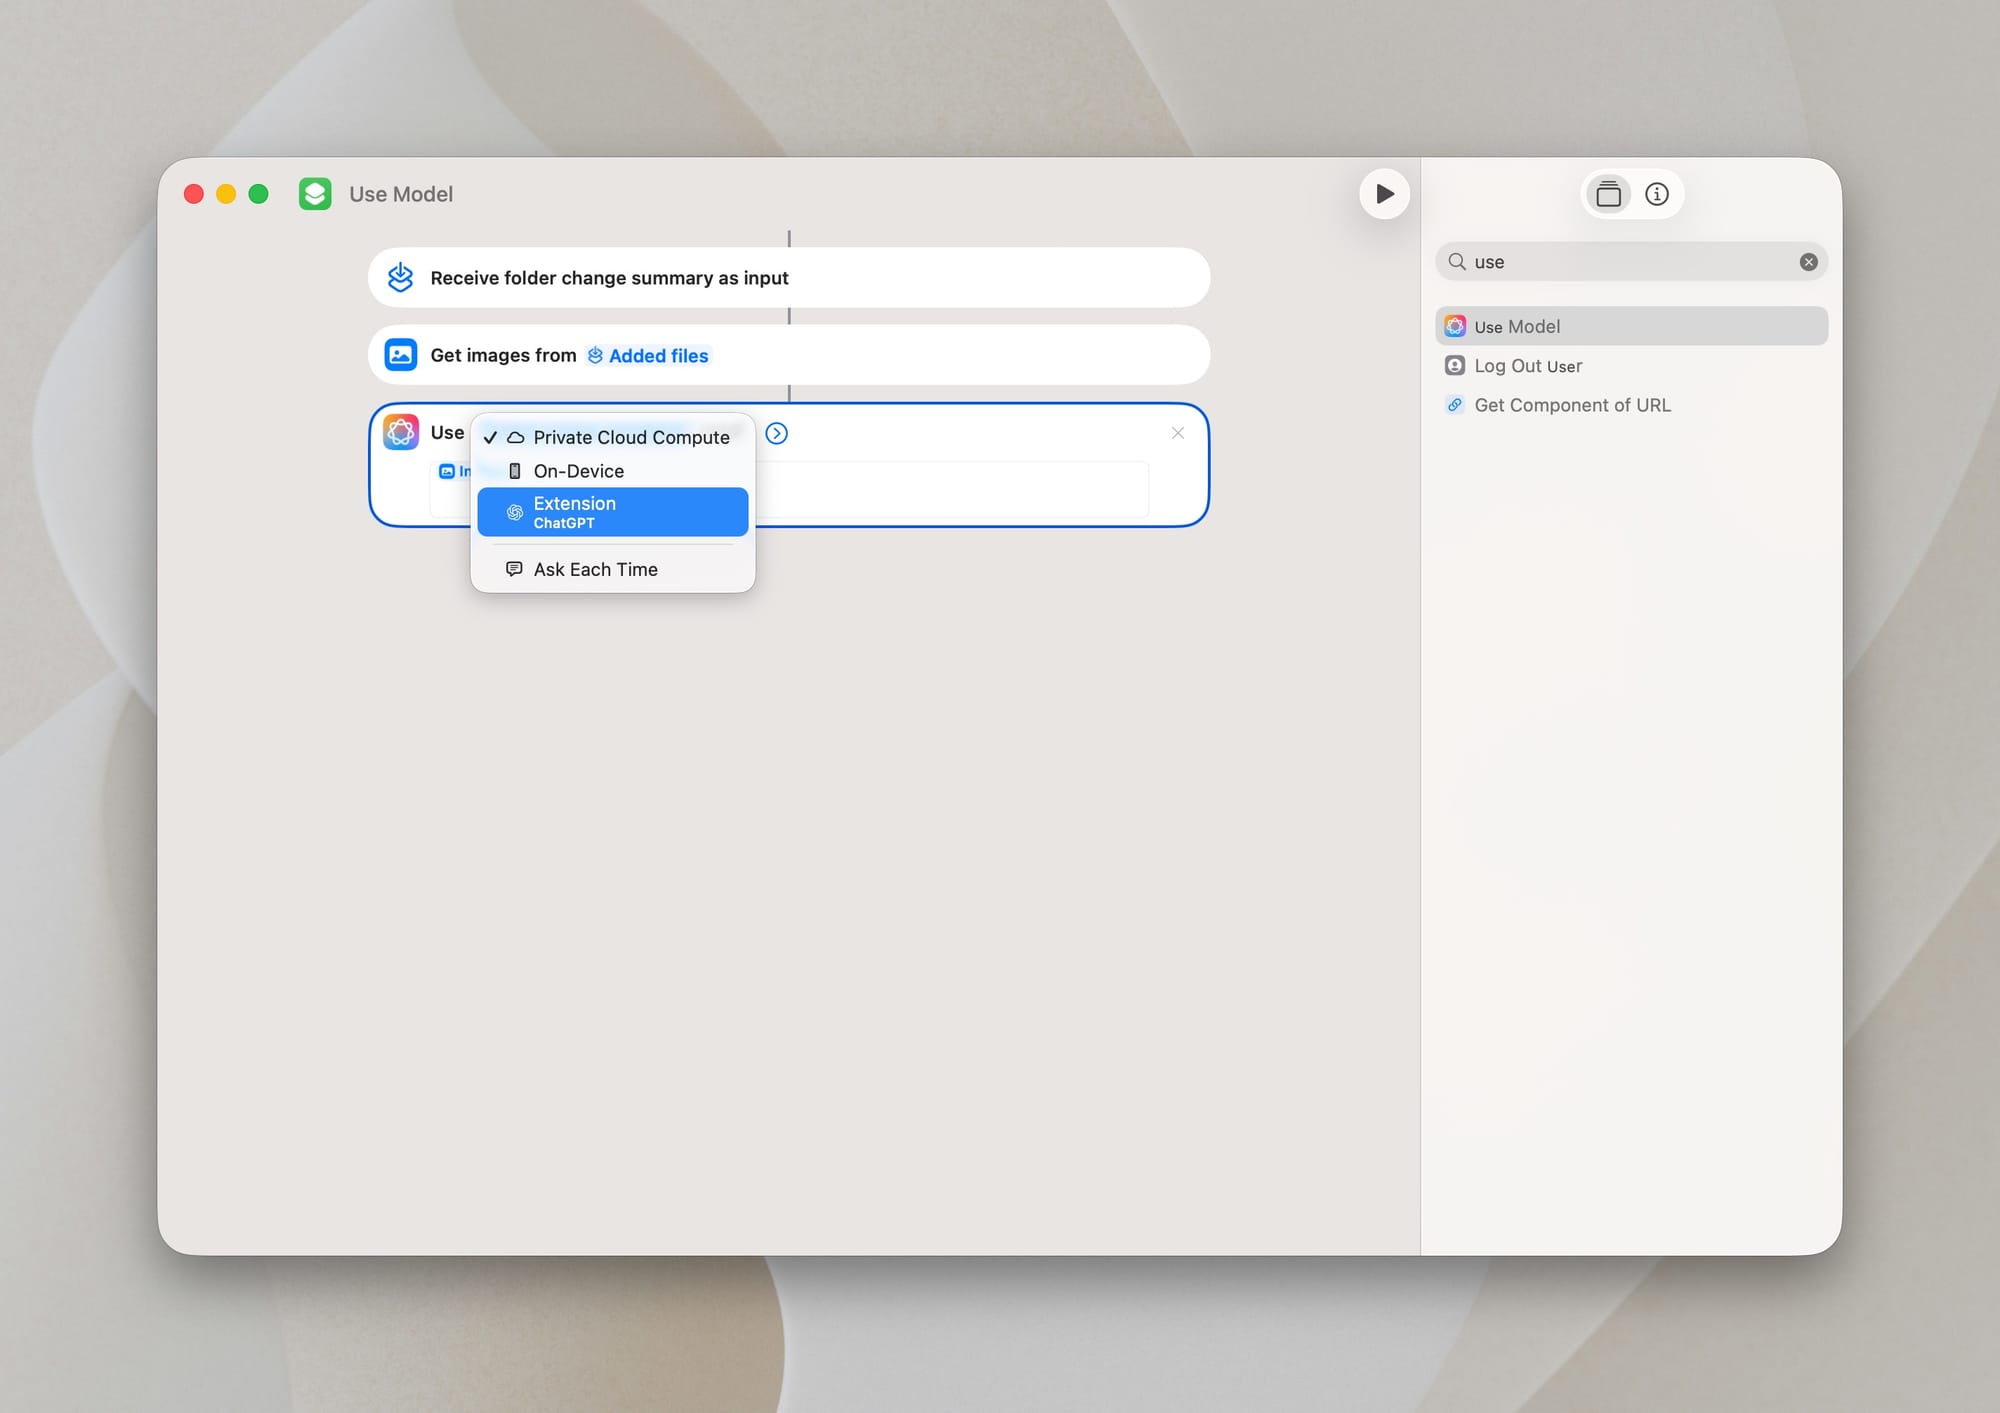
Step 3: Feed the screenshot to AI
Find and add the action Use Model, then set it to your preferred option (e.g., Apple Intelligence, ChatGPT, etc.).
Your prompt can be simple but specific. Here’s the one I use:
Look at the screenshot and generate a filename that describes its visible content.
Use only lowercase and hyphens.
Avoid generic words like “screenshot” or “image”.
Keep it specific and no longer than 10 words. Output only the filename.
Append exactly this extension at the end: .png
Do not change or guess the extension.

Screenshot: 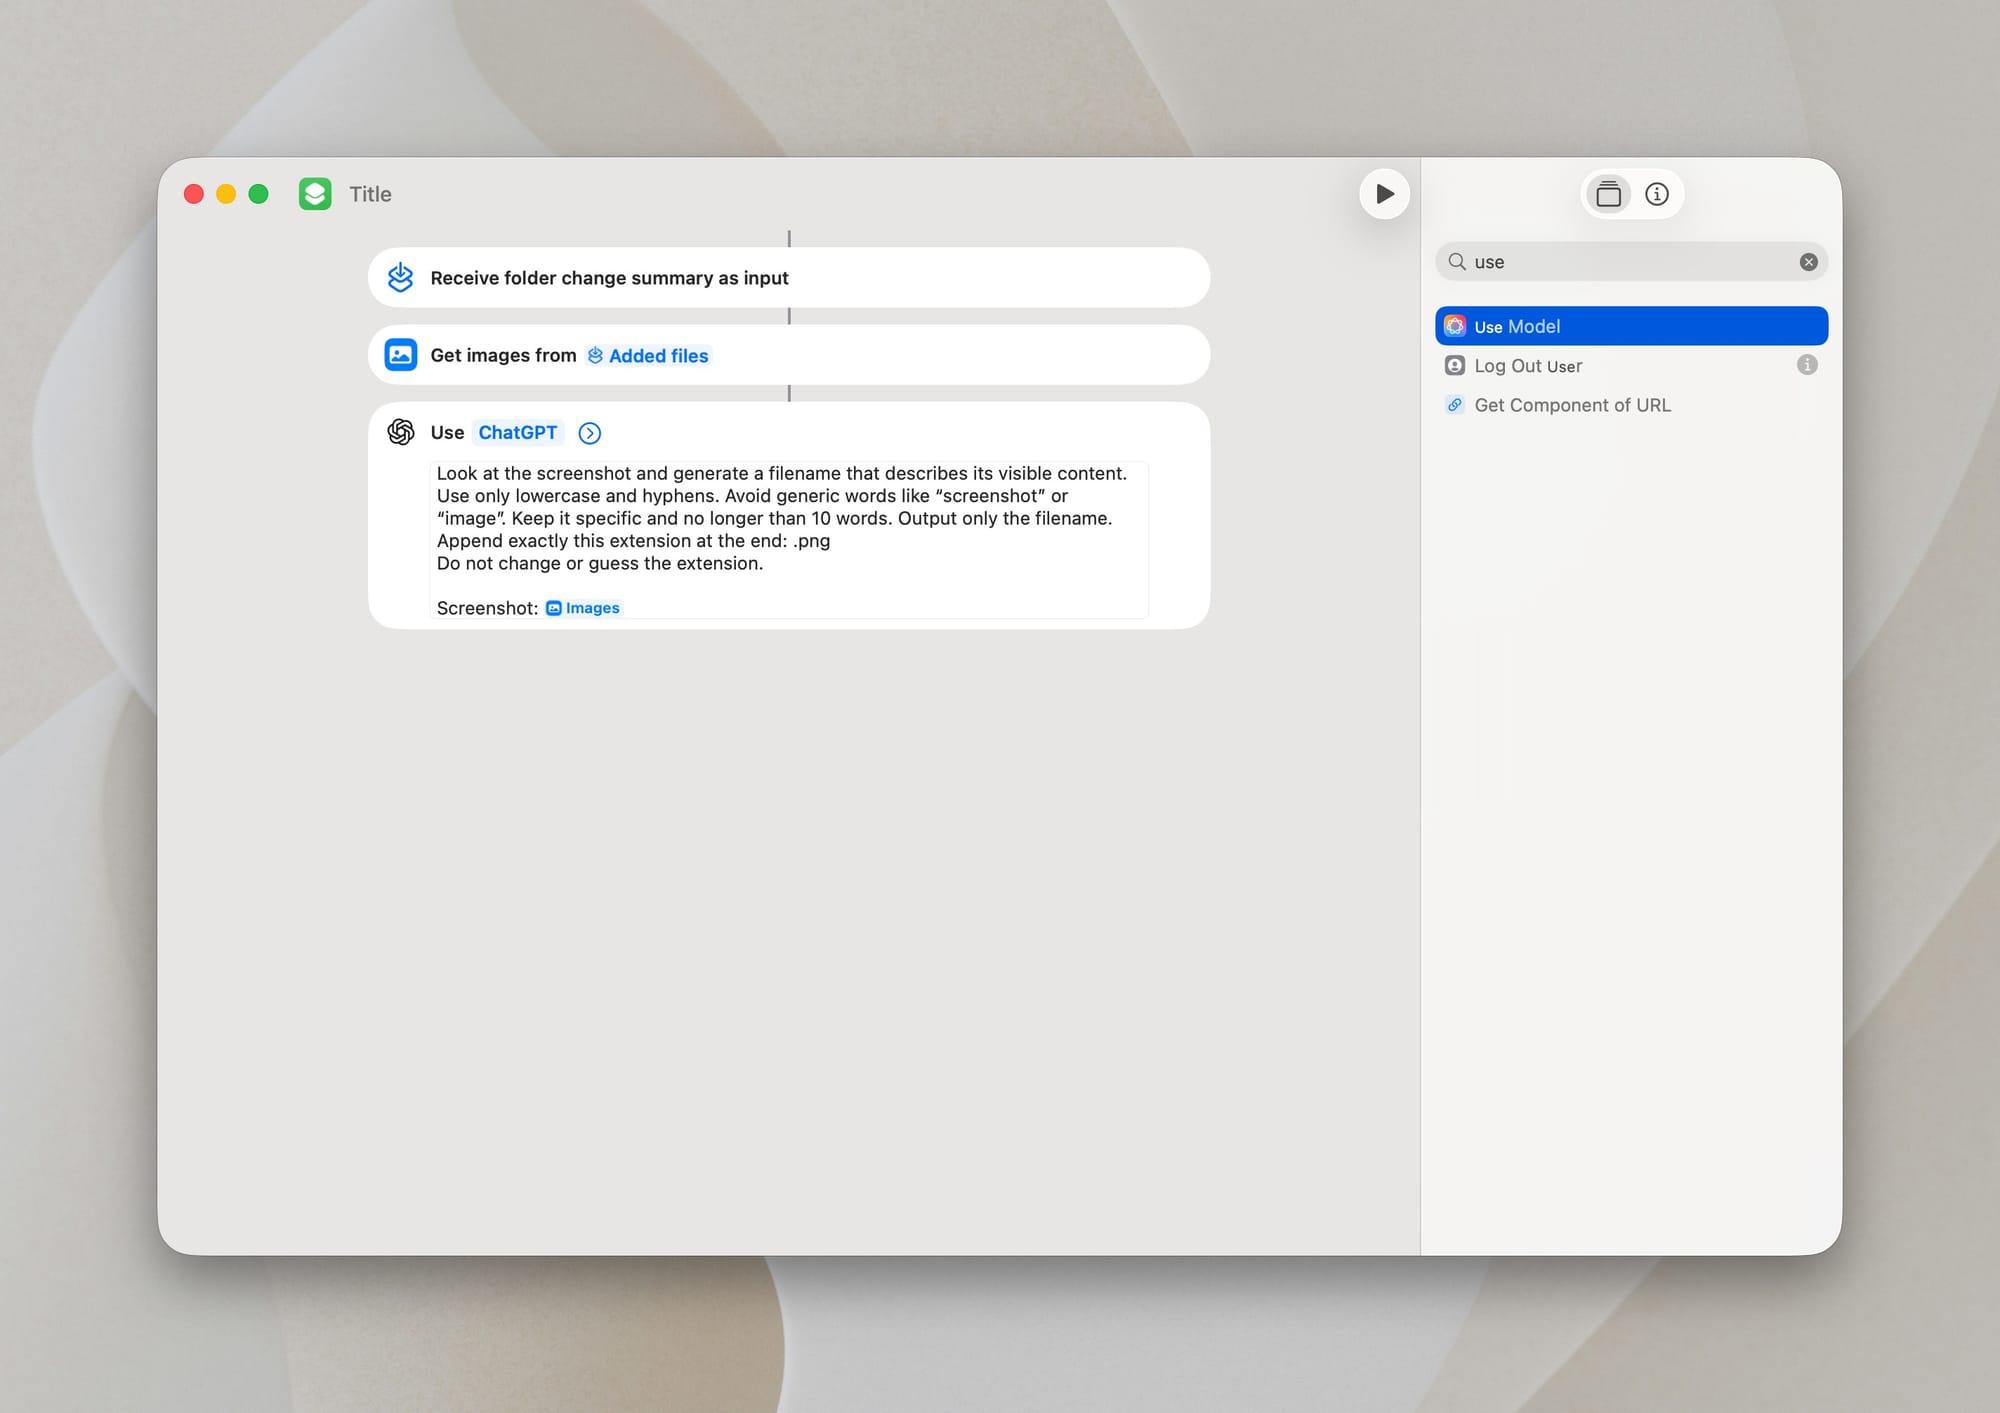
Make sure to right-click on the input field you've added your prompt to and select Insert Variable → Images, so the Images variable is added to the end of your prompt.
👨💻 A few notes for the prompt:
- Add constraints, or your AI might turn your filename into a novella.
- Mention “only output the filename” or it may send paragraphs.
- Keep the word limit low for clarity.
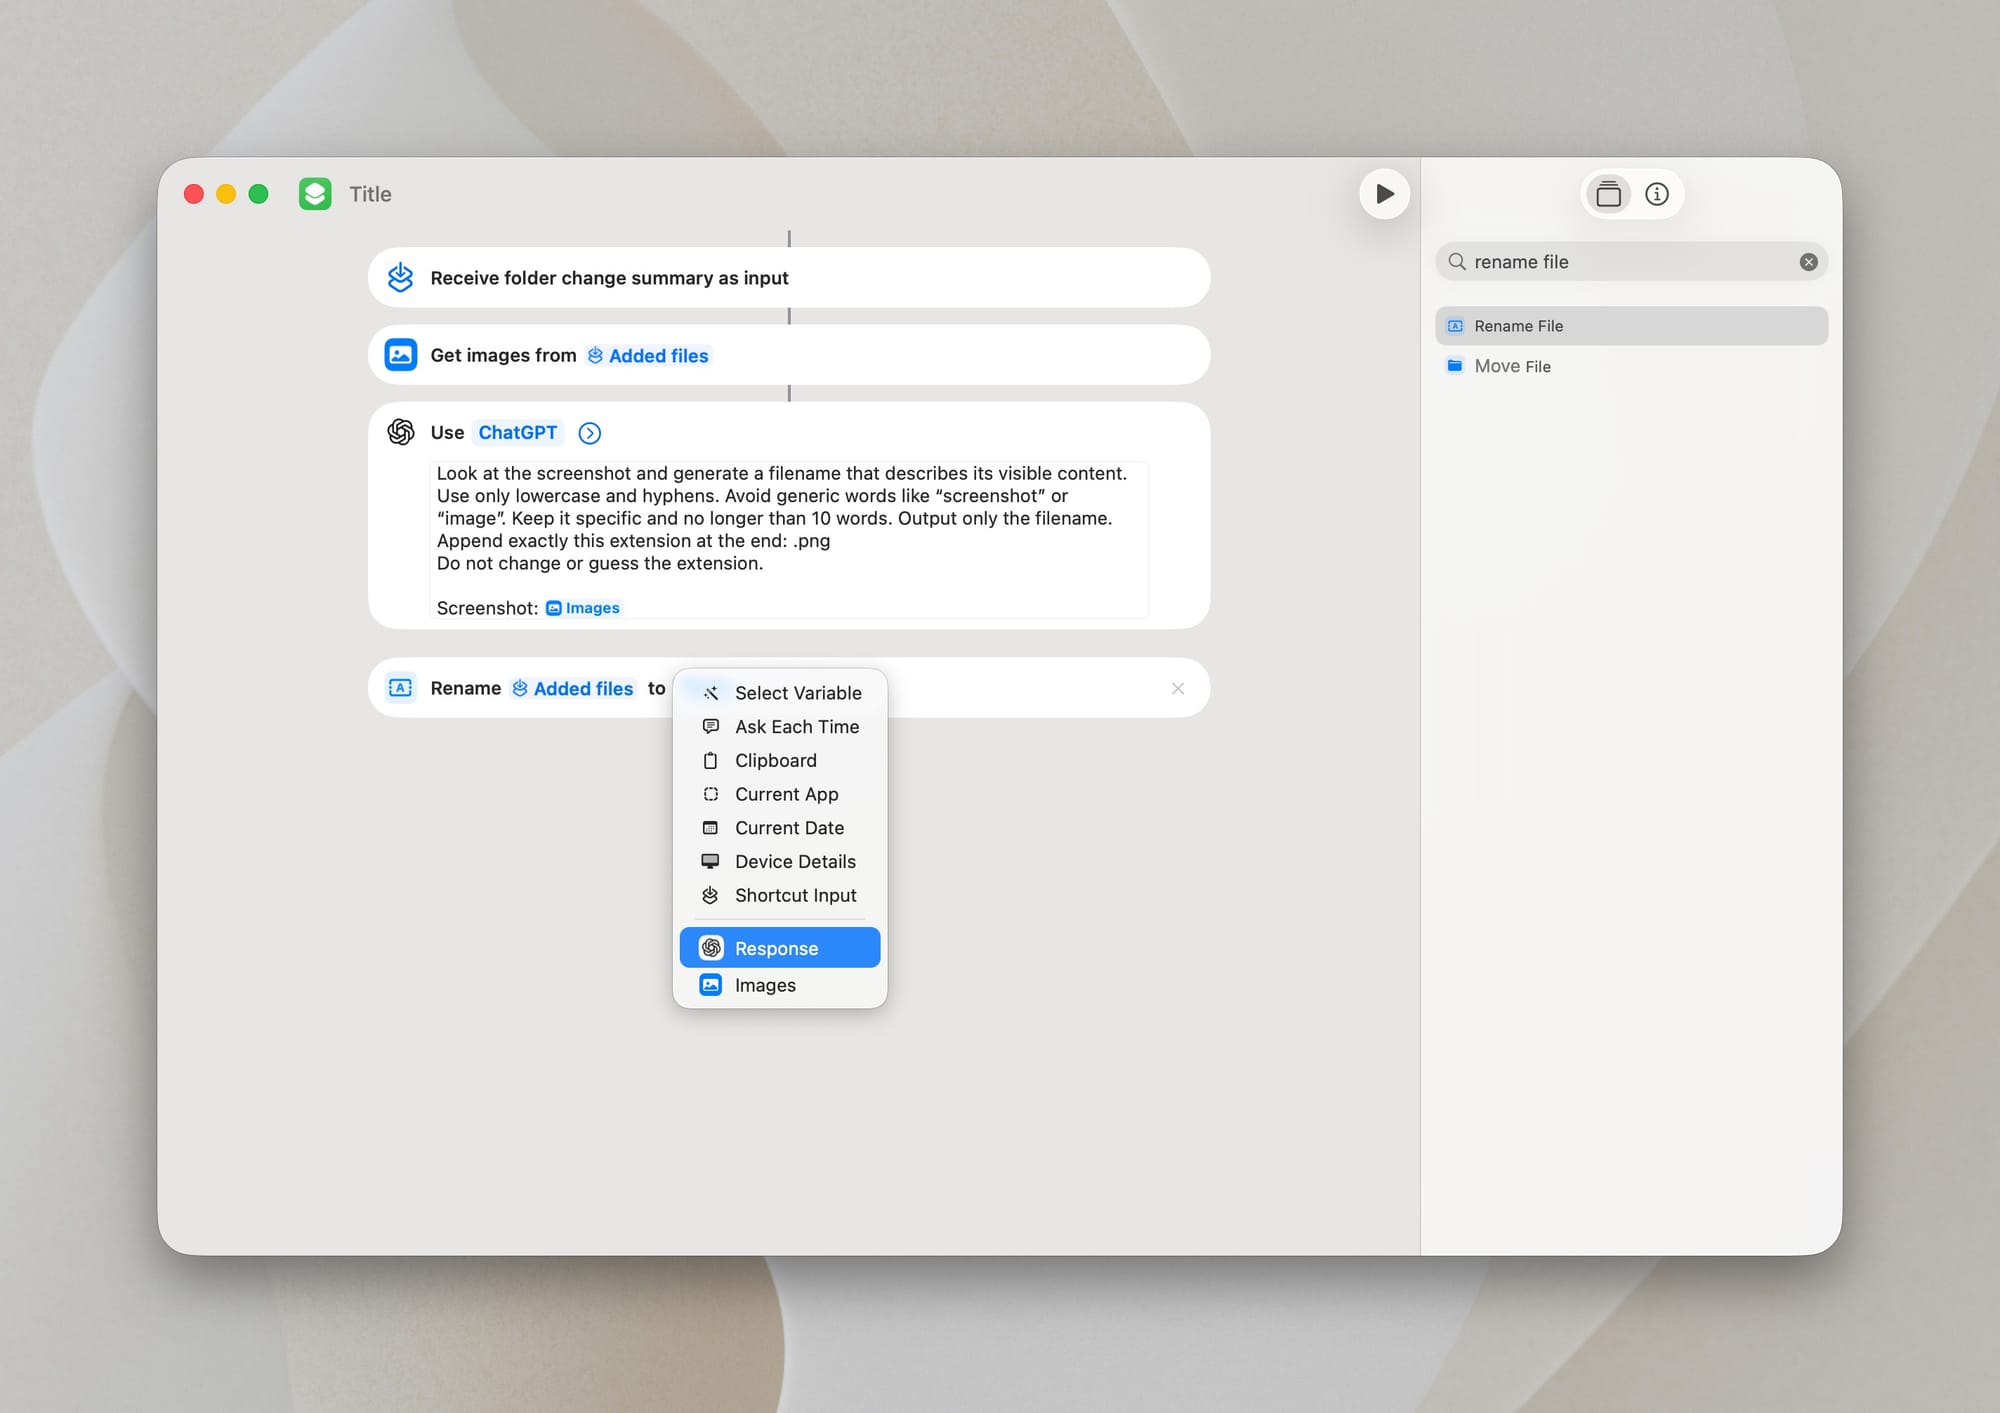
Step 4: Rename the file
Add the final action, Rename File, and configure it to:
- Change Response to Shortcut Input and click it again to select Added Files
- Set the Name to the AI's Response
And that’s it, this is the whole workflow. Save it, give it a name like "Screenshot Renamer", and (optionally) set a custom icon.
Now that the shortcut is set up, every screenshot you take becomes fully automated. When a new file appears in your Screenshots folder, the shortcut runs automatically, analyzes the image, generates a clear, descriptive name using AI, and renames the file instantly. You don’t need to trigger anything manually or remember to tidy things up later. Just capture everything you need, and macOS quietly handles the rest, keeping your library organized, clean, consistent, and easy to search.
Common issues and how to avoid them
A few things I’ve learned while using this in the real world:
- AI sometimes gets creative. Add a word limit because, without it, filenames occasionally drift into poetry.
- Keep all screenshots in one folder. Shortcuts can only monitor a single folder per automation.
- Avoid reorganizing files while the automation runs. The Shortcut triggers instantly and may act on files while you move them manually.
- The content determines name quality. Blurry, partial screenshots sometimes produce vague names. It’s still better than the default.
- Be mindful of privacy preferences. Apple Intelligence can generate filenames entirely on‑device, while ChatGPT may process images in the cloud. Choose the option that matches your privacy preferences.
Optional upgrades you can add later
Once you’re comfortable, you can extend the Shortcut with a few helpful enhancements that make the workflow even more powerful and personalized. Here are some ideas for inspiration:
- Auto-move screenshots into yearly or monthly subfolders
- Auto-tag them (e.g., "work", "travel", "design")
- Ask for confirmation before renaming
- Compress and archive older screenshots
- Send info to a note, or a Todoist task
This is one of those workflows that grows with you.
Closing thoughts
This automation didn’t just tidy up my screenshots; it actually changed how I use them day to day. Ever since I enabled it, I’ve found myself taking even more screenshots because they’ve quietly become a sort of visual notes archive. A good example happened recently while I was working on some significant library changes in Figma. I took a bunch of screenshots of components and mockups so I could compare them once the updates were done. Thanks to the automation, each screenshot was renamed to match its contents, so when it came time to review everything, I could pull up exactly what I needed with a quick file search in Raycast. It felt like pure magic.
Small automations like this are the kind of quality‑of‑life upgrades that make macOS feel personal. They remove friction quietly, letting you focus on your work instead of digging through files.
If you plan to build this yourself and want help tailoring the prompt or extending the automation, feel free to reach out in the comments.